
When you pass a newly landscaped highway embankment in the spring, you might notice something. The slope has a pale green tint that is almost artificially uniform, pressed against bare ground. Still, it doesn’t look like grass. In a week, it will be ready. Hydroseeding slurry, which is a green film, has been working quietly and unglamorously on suburban lawns, construction sites, and roadside ditches for more than eight decades.
Strangely detailed is the origin story. In the 1940s, Maurice Mandell, an engineer from Connecticut, combined water and seed and sprayed it onto steep expressway slopes that would have been difficult to seed manually. Success was achieved. Since the 1960s, the concept has spread from motorways in the UK to golf courses, landfill restoration, and the backyard of a suburban Ohio resident who couldn’t get their grass to grow.
The procedure itself is simple, but the details are more important than most people realize. Using a truck-mounted or trailer-mounted tank, seed, water, mulch, and fertilizer are mixed into a slurry, which is then uniformly sprayed on prepared ground. Like glue, tackifiers hold the mixture in place after application. A green dye is usually added to help direct the spraying process. Watching a professional operator work on a large site appears almost casual. Precision is less important than the outcome.

No Dig Gardening for Beginners – What You Need to Know
The reasonable prices will surprise people who believe this is a premium service. Since hydroseeding costs between ten and twenty-two cents per square foot, a ten-thousand-square-foot lawn would cost between a thousand and twenty-two hundred dollars. While it is more expensive than manually dispersing dry seed, it is considerably less expensive than sod for the same area. Sprouts typically appear in five to fourteen days after hydroseeding, and under ideal conditions, a walkable lawn can be achieved in five weeks. Hydroseeding fills that gap with speed, consistency, and much higher germination rates.
Most failures begin with soil preparation, which is undervalued by most people. Compacted ground does not accept the slurry well. On construction sites where heavy machinery has effectively cemented the earth, it is necessary to break up hard, dense surfaces before anything else can happen. Grading uneven areas, removing debris, and testing soil chemistry are more important than they appear at first glance. Low nitrogen levels might not be compensated for by slurry fertilizer. Most hardware stores carry a quick 15-minute soil test kit that can save you months of frustration.
The No Dig Method and What It Does to Weeds Over Time
Timing is probably the most controllable factor. In the spring and fall, mild and moist conditions are ideal for new seeds to root. Hydroseeding in the summer is effective, but it requires a lot more water and care. A newly seeded area can dry out in a day in a hot, dry August, and the germinating seeds rarely return. For cool-season varieties like tall fescue, hydroseeding in the fall at least 45 days before the first expected frost usually yields the best results.
Most hydroseeded lawns are lost during watering after application. For the first few weeks, the schedule may seem monotonous — ten to twenty minutes twice or three times a day. Hydraseeding has the advantage of retaining moisture better than conventional broadcasting because the mulch layer in the slurry retains moisture better than bare soil. That retention, however, can only carry the seed so far. A few days of neglect during a dry period during early germination can ruin weeks of preparation. Under a green-tinted crust, the grass is there, barely noticeable, doing something unseen, and it’s difficult not to sense tension there.
| Category | Details |
| Topic | No Dig Gardening |
| Also Known As | No-till gardening, lasagna gardening, sheet mulching |
| Key Figure | Charles Dowding — leading practitioner and educator |
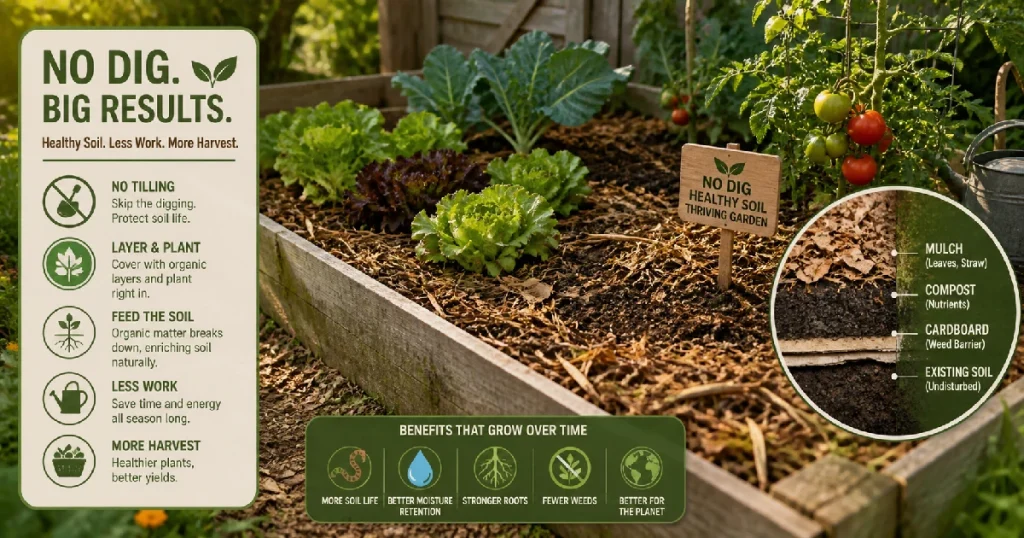
| Core Method | Layering compost or organic matter on undisturbed soil surface |
| Starting Materials | Cardboard, compost, well-rotted manure or leaf mould |
| Best Time to Start | Autumn ideal — but any time works |
| Compost Depth Needed | 5–15cm (2–6 inches) depending on weed pressure |
| Key Benefits | Fewer weeds, better moisture retention, improved soil life |
| Yield Advantage | Up to 12% more food than dug beds with the same compost |
| Suitable For | Vegetables, annuals, clay soil, allotments, small gardens |
| Reference Website | www.charlesdowding.co.uk |
Before mowing the grass, it usually takes three to four weeks for it to reach three to four inches. Cutting lower stresses new roots that are just establishing their grip, so only the top third should be removed in the first cut. Fertilizer is applied after about 30 days, and weed control takes three to four months. Laying sod appears to be completed almost instantly, but the timeline seems lengthy. Whether you value a lawn that grows from the ground up or the instant gratification of sod depends on what you value.
It is not only practical, but frequently the most sensible approach for large areas, steep slopes, or properties where erosion is active. Perhaps more homeowners would select it if they knew it existed.
As a Senior Editor at Mini Greenhouse Kits, Hannah Kinsley is a passionate supporter of small-space gardening and urban gardening. Hannah, who is currently majoring in Environmental Policy through the University of Michigan’s Environmental Studies program, infuses her writing with a solid academic foundation and a sincere enthusiasm for the environment. You can find her playing soccer or exploring the city’s green areas with friends when she’s not researching the newest trends in city gardening or creating content for minigreenhousekits.com.